


|

|
 
002 :: HDRI & Luminance space
|
| | |
[If you use Netscape you might see some oddity in terms of page layout, in that case use this Netscape friendly version.]
HDRI is something that I have started to get more and more questions about in terms of what it really is and how it is used. So, here in this issue of Type'd I'll try to explain HDRI and some of the usage's of it in fairly simple terminology. For more information and more in-depth reading, check out the links at the bottom of this page.
This issue of Type'd will have a little bit more software specific terminology than previously, but if you know of equivalent settings/terminology for other packages than used here, feel free to let me know. Let's start..
|
HDRI; High Dynamic Range Image
The 'High Dynamic Range' in HDRI is what makes it interesting - a 'normal' bitmap [JPEG, TIFF, BMP ...] is a low dynamic range image and are usually represented by eight bits per pixel with values between 0-255 [in RGB mode] to describe the different channels. In contrast to that you've got the HDR images which have the important property that their pixel values are proportional to the amount of light at any given pixel. I.e. the HDR format stores the amount of light every pixel represents instead of on-screen colors that normal bitmaps do. A pixel in a HDR image is defined by floating point numbers such as 0.943234 or 543423.0434 with no defined upper limit instead of 0 .. 255. [fig. 1.1 & 1.2]
The key part of a HDR image is that it has a greater dynamic range than what can be displayed on a standard digital device or than what can be captured with a single exposure. Therefore its most common that a HDR image have been made from several different images or a render from a render engine that supports unclamped luminance values.
Some of the usage's of HDRI is to let it reflect in raytraced reflections, use it as a skylight in capable renderers, calculate point lights for usage in non-GI renderers, mapping diffuse and specular convolution for speedy application to objects with responding properties and it can be mapped just as any other bitmap to the environment, half-sphere, plane or any other mappable object/property.
There's basically two parts when it comes to using a HDR image in a render engine:
High Dynamic Range in Reflection/Refraction's:
Now, I created this scene so that it can demonstrate the reflective properties fairly simply. In the bottom right there's a chrome sphere [100% reflective] then to the left of that there's this red sphere. The red sphere has the same reflective properties of the glass sphere [Fresnel reflection] in the back but with no refraction so that we can concentrate on the reflections in this test. The 'table' of the scene has a wood texture on it plus glossy reflection controlled by a fresnel map. The whole scene is lit with a plain white skylight.
Fig. 2.1 Note that you can see the tree outside the window in the red sphere's reflection of the same.
Now, for the first image [fig. 2.1] I've added a panoramic HDR image to the environment with spherical mapping, note how the HDR's luminance values gets adapted in a very nice way in the red sphere vs the chrome sphere. Note that the kitchen windows in the chrome sphere are blown out [fig. 2.1.2] with corresponding glare recorded at that exposure with the camera - while in the red sphere you can see the tree outside the window [fig. 2.1.1]. This is possible due to the fact that the luminance values have been scaled appropriately considering the strength of the reflections, the chrome sphere which is 100% reflective reflects the HDR image at the full strength of which it is set to render at but the red sphere which has maybe 5% of reflectivity at that spot brings down the HDR image to representative values.
Now, lets use a JPEG of the same panoramic image as the environment instead and see what happens. This JPEG was created by opening the HDR image and simply just saving it out as a JPG file, I happened to get a slight contrast change but that's not that important for this example.
See how the adaptive luminance of the HDR isn't visible in this render and that it looks very CG in its behavior, there's a slight trick you should be able to do in your 3d software to extend the range in your low-dynamic image with the usage of output control graphs for the bitmap. In figure 2.3 that's exactly what I have done, a fairly steep graph has been added to increase the output of the brightest values 6 times and as you can see the windows start to pop out on the red sphere, but note that this is just a brightened version of the bitmap that's visible in the chrome sphere, its just as blown out but the luminance has been scaled down to a gray murk.
 Fig. 2.3 Some people might map a normal bitmap as an environment map and put some reflective objects in the scene and call that a HDRI render, while some techniques [fig 2.3] can extend the dynamic range of the low-dynamic range JPEG it will not become a high dynamic range image because of that.
| 
Since some terminology in this Type'd issue can be fairly software specific here's a little key:
Render Effect 3D Studio Max; A 2D image post processing filter/pass performed post-render.
Output Control 3D Studio Max; Options to extend the rendered values of a map
Skylight Brazil R/S; Ambient-like, non-directional lighting -- also known as skydome.
HDRI related formats: Radiance map; 16-bit or Floating point TIFF; Portable Float Maps ...
Fig. 1.1 Note that the numbers for the HDRI part are not correct but only used as a illustration vs the bitmap. The bitmap uses numbers from LAB format and refers to a 8bit format.
Fig. 1.2 When the luminance of the bitmap gets scaled, either as a render effect or as part of a reflective material, the bitmaps brightest values start to go towards gray while the HDR images values keep the same relative values but remaps them.
|
So, do you need to use a radiance map in the environment slot? No, of course not. Your 3d software should treat a HDR image as any other bitmap as long as you got a appropriate HDRI loader installed -- therefore you can map a HDR image in any material slot really, even though the self-illumination slot is most likely the most convenient space for it.
In this [fig 2.4] image a HDR image has been placed on a plane in the scene, these types of white planes are commonly used in scenes with reflective areas and might be configured to look like a 'standard' light reflector, window or door openings. Using HDR in the mapped image you can see that the glass reflects a grid pattern and that the chrome sphere has a blown out reflection as shown in previous HDR example [fig. 2.1].
| 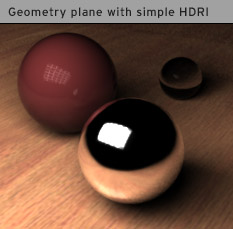
Fig. 2.4 A very simple HDR image mapped to a plane to simulate a light reflector.
|
HDRI for illumination
Another major part for usage of HDRI is for illumination itself. Now there's a few routes you can take of which two of them are to actually generate point lights from a calculation of the HDR image and another is to map it directly to a skylight function of a GI capable render engine.
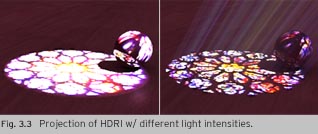
These examples below have been made with the usage of Brazil R/S and its Quasi Monte Carlo sampled skylight feature. What happens then is that since the HDR image contains luminance information at the exposure set the lighting will behave in basically the identical way it behaved on scene of the capturing of the data.
 Fig. 3.2 Note how the lighting changed accordingly when I swapped the HDRI or changed exposure, also note the shadows generated by the HDR -- diffuse area shadows from the kitchen windows but sharper shadows from the small windows in the church.
A HDR image should behave as a normal 'bitmap' as mentioned earlier and can therefore as well be mapped to the projection of a pointlight for example, this will have the same benefits as using a HDR vs a bitmap in reflections.
|

Fig. 3.1 Here is an HDR image displayed at a few different exposure settings.
|
Clamped and Unclamped.
A prerequisite for 'correct' working usage of HDR images is that the renderer supports the 'unclampedness' of the images itself. Unclamped means that the renderer will not limit the color space of the output image to values supported by a standard JPEG for example, but rather keep the extra information so that the result can be manipulated accordingly when this extra information is kept it is referred to as unclamped, using this unclamped luminance values certain effects can be created that respect these values and the result will therefore be closer to film.
The figures below showcase a few of these effects.
|
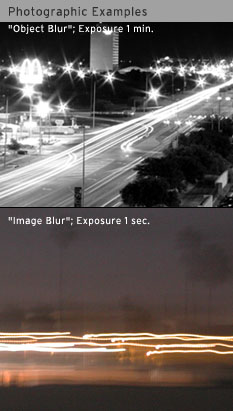
Motion blur, luminance blur; When a very bright light passes in front of a camera during a longer exposure you will see that the light itself leaves a brighter trail after it than other not so bright areas. A good example of this is rear lights of cars that leaves streaks at night as seen in the photo to the right.
|
|
That's all for this time, hope you've enjoyed it and have gained some knowledge into the basic operation of HDRI and luminance space. I want to thank Scott Kirvan, Andrew Harron and Mike Bailey for their help in brainstorming and a extra big thanks to Scott and Andrew for letting me use their photographs for the photographic blur examples. As well, a big thanks to Paul Debevec for starting the whole thing and all the light probes used in the examples is from him as well.
Now you can view a few of my HDRI rendered images on my Brazil R/S page as well as explore the links below to get more in-depth information about High Dynamic Range Images.
Explore Further:
Paul Debevec; You can read a lot more in-depth about HDRI and image based lighting in his related documents.
HDR Shop; Image manipulation and HDR image creator.
mkhdr; Free software to create a HDR image from a series of low-dynamic range images.
Virtual Vienna Panoramas and HDRI's; Some freely available light probes from Vienna.
"Get rid off the Photographer"; A Tutorial on removing the photographer from HDR images (uses Panotools).
SpheronVR; Makers of a camera for easy HDRI capturing..
"From Fisheye to HDRI"; Tutorial for how to create a sort of HDR image..
|
|